
An overview of the Decorator design pattern and its implementation in Dart and Flutter
Previously in the series, I analysed a relatively simple, but very practical design pattern — Proxy. This time I would like to represent a design pattern, that, unlike the Strategy design pattern, extends the functionality of an object instead of exchanging it. It is a structural design pattern called Decorator.
To see all the design patterns in action, check the Flutter Design Patterns application.
What is the Decorator design pattern?

Decorator, also known as Wrapper, is a structural design pattern, which intention in the GoF book is described like this:
Attach additional responsibilities to an object dynamically. Decorators provide a flexible alternative to subclassing for extending functionality.
The Decorator design pattern provides a way of changing the skin of an object without changing its guts - it extends an object's functionality by wrapping it in an object of a Decorator class, leaving the original object intact without modification. Therefore, the pattern helps support one of the SOLID principles - the Open/Closed Principle (classes should be closed for modification, but open for extension).
The decorations (decorator classes) are independent of each other, hence they can be composed and chained together to add multiple behaviours (inception flashbacks, huh?). Also, another advantage is that this behaviour could be added at run-time, which leads to very flexible reuse of code, unlike using class inheritance. In addition to this, changing the order of decorators allows adding any combinations of responsibilities. However…
With great power comes great responsibility
The usage of the Decorator design pattern can also increase the complexity of code. To implement a specific component and make it modifiable at the run-time, not only do you need to implement the Component but also an indefinite amount of Decorator classes should be added to wrap it. A larger number of classes can sometimes be overwhelming, also debugging and testing the component wrapped by several additional classes does not make the development easier, too.
Let's move to the analysis and implementation parts to understand and learn the details about this pattern and how to implement it!
Analysis
The general structure of the Decorator design pattern looks like this:
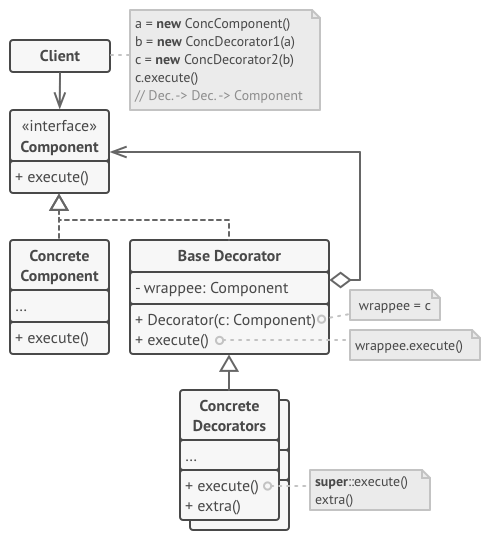
- Component - defines the interface for objects that can have responsibilities added to them dynamically;
- Concrete Component - defines an object to which additional responsibilities can be added. It contains the basic behaviour which can be altered by decorators;
- Base Decorator - has a field referencing a wrapped object which type should be declared as the component interface so it can contain both concrete components and decorators;
- Concrete Decorators - adds responsibilities (extra behaviour) to the components dynamically;
- Client - initialises the concrete component and wraps it in multiple layers of decorators extending its default behaviour dynamically.
Applicability
The Decorator design pattern should be used when you need to add extra responsibilities to objects dynamically (at run-time) without affecting other objects. Since all the decorator objects implement the same interface, they can be used in various combinations and interchanged with each other.
Also, this design pattern is useful when extension by subclassing is impractical or even not possible. For instance, sometimes a large number of independent extensions are possible and would produce a huge number of subclasses to support every combination - for those cases, the Decorator design pattern is a better option.
Finally, the Decorator design pattern could be simply used to refactor the code base and split components with hard-wired extensions (compile-time implementation dependencies) into separate classes. As a result, code becomes more readable/maintainable (there would be less code in smaller classes) and at the same time more flexible.
Implementation

In the Flutter community, it is quite popular to create food delivery/restaurant type of applications. With the implementation of the Decorator design pattern, we will jump into this hype train and will build a prototype for the pizza delivery application, to be more specific, for the pizza selection from the menu.
Let's say we have a small restaurant which makes 3 kinds of pizza:
- Margherita - Sauce, Mozzarella, Basil, Oregano, Pecorino, Olive Oil;
- Pepperoni - Sauce, Mozzarella, Pepperoni, Oregano;
- "Make-Your-Own" - any combination of pizza toppings from the list of Basil, Mozzarella, Olive Oil, Oregano, Pecorino, Pepperoni, and Sauce.
All the pizzas are of the same size, pizza toppings have different prices.
It is quite clear for the pizza Margherita or Pepperoni - the recipe is clear, you just need to add the necessary toppings and calculate the final price, easy peasy. However, for the custom pizza, it would be very impractical to prepare the pre-defined recipes for all the possible combinations - that's just not how it works usually from the business point of view.
For this problem, the Decorator design pattern is a great option since we can make the pizza toppings as separate decorator classes, use them to wrap the pizza base (the base component) and calculate the final price of the pizza based on the selected toppings. Let's check the class diagram first and then implement the pattern.
Class diagram
The class diagram below shows the implementation of the Decorator design pattern:
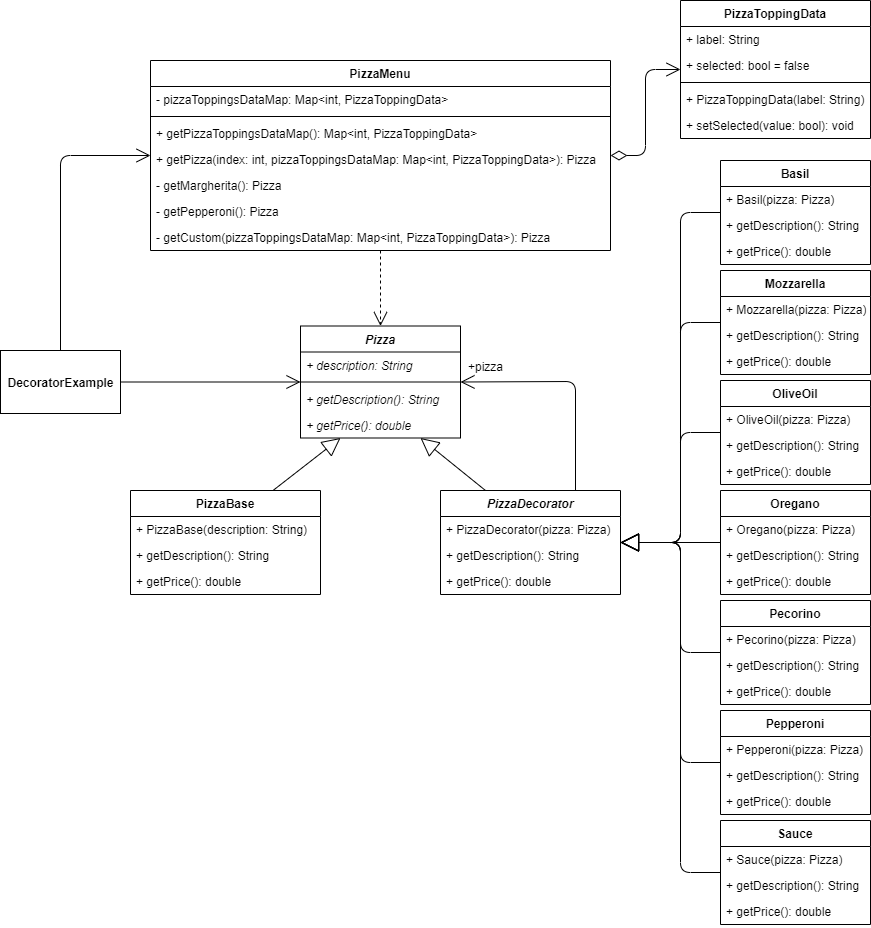
Pizza defines a common interface for wrappers (decorators) and wrapped objects:
getDescription()- returns the description of the pizza;getPrice()- returns the price of the pizza.
PizzaBase represents the component object which extends the Pizza class and implements its abstract methods.
PizzaDecorator references the Pizza object and forwards requests to it via the getDescription() and getPrice() methods.
Basil, Mozzarella, OliveOil, Oregano, Pecorino, Pepperoni and Sauce are concrete decorators extending the PizzaDecorator class and overriding its default behaviour by adding some extra functionality/calculations of their own.
PizzaToppingData class stores information about the pizza topping's selection chip used in the UI - its label and whether it is selected or not.
PizzaMenu class provides a getPizzaToppingsDataMap() method to retrieve the pizza topping's selection chip data. Also, getPizza() method is defined to return the specific Pizza object based on the selected index in the UI or the selected pizza toppings.
DecoratorExample initialises and contains the PizzaMenu class object to retrieve the selected Pizza object based on the user's selection in the UI.
Pizza
An interface of the Pizza component that defines a common contract for concrete components and decorator objects.
abstract interface class Pizza {
  String getDescription();
  double getPrice();
}
PizzaBase
A concrete component that implements the Pizza interface. An object of this class (its behaviour) gets decorated by the specific decorator classes.
class PizzaBase implements Pizza {
const PizzaBase(this.description);
final String description;
String getDescription() => description;
double getPrice() => 3.0;
}
PizzaDecorator
An abstract decorator class that maintains a reference to a component class and forwards requests to it.
abstract class PizzaDecorator implements Pizza {
const PizzaDecorator(this.pizza);
final Pizza pizza;
String getDescription() => pizza.getDescription();
double getPrice() => pizza.getPrice();
}
Concrete pizza decorators
Basil, Mozzarella, OliveOil, Oregano, Pecorino, Pepperoni and Sauce are concrete decorator classes of the Pizza component. Each of these classes wraps the pizza object and adds additional value for the final price in the getPrice() method, and also extends the final pizza's description in the getDescription() method.
- Basil:
class Basil extends PizzaDecorator {
const Basil(super.pizza);
String getDescription() => '${pizza.getDescription()}\n- Basil';
double getPrice() => pizza.getPrice() + 0.2;
}
- Mozzarella:
class Mozzarella extends PizzaDecorator {
const Mozzarella(super.pizza);
String getDescription() => '${pizza.getDescription()}\n- Mozzarella';
double getPrice() => pizza.getPrice() + 0.5;
}
- Olive Oil:
class OliveOil extends PizzaDecorator {
const OliveOil(super.pizza);
String getDescription() => '${pizza.getDescription()}\n- Olive Oil';
double getPrice() => pizza.getPrice() + 0.1;
}
- Oregano:
class Oregano extends PizzaDecorator {
const Oregano(super.pizza);
String getDescription() => '${pizza.getDescription()}\n- Oregano';
double getPrice() => pizza.getPrice() + 0.2;
}
- Pecorino:
class Pecorino extends PizzaDecorator {
const Pecorino(super.pizza);
String getDescription() => '${pizza.getDescription()}\n- Pecorino';
double getPrice() => pizza.getPrice() + 0.7;
}
- Pepperoni:
class Pepperoni extends PizzaDecorator {
const Pepperoni(super.pizza);
String getDescription() => '${pizza.getDescription()}\n- Pepperoni';
double getPrice() => pizza.getPrice() + 1.5;
}
- Sauce:
class Sauce extends PizzaDecorator {
const Sauce(super.pizza);
String getDescription() => '${pizza.getDescription()}\n- Sauce';
double getPrice() => pizza.getPrice() + 0.3;
}
PizzaToppingData
A simple class that contains data used by the pizza topping's selection chip in the UI. The data consists of the label property and the current selection state (whether the chip is currently selected or not) which could be changed by using the setSelected() method.
class PizzaToppingData {
  PizzaToppingData(this.label);

  final String label;
  bool selected = false;

  void setSelected({required bool isSelected}) => selected = isSelected;
}
PizzaMenu
A simple class that provides a map of PizzaToppingData objects via the getPizzaToppingsDataMap() method for the pizza toppings selection in UI. Also, the class defines a getPizza() method which returns a Pizza object that is built by using the pre-defined concrete decorator classes based on the pizza recipe - Margherita, Pepperoni or custom (based on the selected pizza toppings).
class PizzaMenu {
  final Map<int, PizzaToppingData> _pizzaToppingsDataMap = {
    1: PizzaToppingData('Basil'),
    2: PizzaToppingData('Mozzarella'),
    3: PizzaToppingData('Olive Oil'),
    4: PizzaToppingData('Oregano'),
    5: PizzaToppingData('Pecorino'),
    6: PizzaToppingData('Pepperoni'),
    7: PizzaToppingData('Sauce'),
  };

  Map<int, PizzaToppingData> getPizzaToppingsDataMap() => _pizzaToppingsDataMap;

  Pizza getPizza(int index, Map<int, PizzaToppingData> pizzaToppingsDataMap) =>
      switch (index) {
        0 => _getMargherita(),
        1 => _getPepperoni(),
        2 => _getCustom(pizzaToppingsDataMap),
        _ => throw Exception("Index of '$index' does not exist."),
      };

  Pizza _getMargherita() {
    Pizza pizza = const PizzaBase('Pizza Margherita');
    pizza = Sauce(pizza);
    pizza = Mozzarella(pizza);
    pizza = Basil(pizza);
    pizza = Oregano(pizza);
    pizza = Pecorino(pizza);
    pizza = OliveOil(pizza);

    return pizza;
  }

  Pizza _getPepperoni() {
    Pizza pizza = const PizzaBase('Pizza Pepperoni');
    pizza = Sauce(pizza);
    pizza = Mozzarella(pizza);
    pizza = Pepperoni(pizza);
    pizza = Oregano(pizza);

    return pizza;
  }

  Pizza _getCustom(Map<int, PizzaToppingData> pizzaToppingsDataMap) {
    Pizza pizza = const PizzaBase('Custom Pizza');

    if (pizzaToppingsDataMap[1]!.selected) pizza = Basil(pizza);
    if (pizzaToppingsDataMap[2]!.selected) pizza = Mozzarella(pizza);
    if (pizzaToppingsDataMap[3]!.selected) pizza = OliveOil(pizza);
    if (pizzaToppingsDataMap[4]!.selected) pizza = Oregano(pizza);
    if (pizzaToppingsDataMap[5]!.selected) pizza = Pecorino(pizza);
    if (pizzaToppingsDataMap[6]!.selected) pizza = Pepperoni(pizza);
    if (pizzaToppingsDataMap[7]!.selected) pizza = Sauce(pizza);

    return pizza;
  }
}
This class (to be more specific, getMargherita(), getPepperoni() and getCustom() methods) represents the main idea of the decorator design pattern - a base component class is instantiated and then wrapped by the concrete decorator classes, hence extending the base class and its behaviour. As a result, it is possible to use wrapper classes and add or remove responsibilities from an object at runtime, for instance, as it is used in the getCustom() method where the appropriate decorator classes are used based on the selected pizza toppings data in the UI.
Example
First of all, a markdown file is prepared and provided as a pattern's description:
DecoratorExample contains the PizzaMenu object which is used to get the specific Pizza object based on the user's selection. Also, all the logic related to the decorator's design pattern and its implementation is extracted to the PizzaMenu class, the DecoratorExample widget only uses it to retrieve the necessary data to be represented in the UI.
class DecoratorExample extends StatefulWidget {
const DecoratorExample();
_DecoratorExampleState createState() => _DecoratorExampleState();
}
class _DecoratorExampleState extends State<DecoratorExample> {
final pizzaMenu = PizzaMenu();
late final Map<int, PizzaToppingData> _pizzaToppingsDataMap;
late Pizza _pizza;
var _selectedIndex = 0;
void initState() {
super.initState();
_pizzaToppingsDataMap = pizzaMenu.getPizzaToppingsDataMap();
_pizza = pizzaMenu.getPizza(0, _pizzaToppingsDataMap);
}
void _onSelectedIndexChanged(int? index) {
_setSelectedIndex(index!);
_setSelectedPizza(index);
}
void _setSelectedIndex(int index) => setState(() => _selectedIndex = index);
void _onCustomPizzaChipSelected(int index, bool? selected) {
_setChipSelected(index, selected!);
_setSelectedPizza(_selectedIndex);
}
void _setChipSelected(int index, bool selected) => setState(() {
_pizzaToppingsDataMap[index]!.setSelected(isSelected: selected);
});
void _setSelectedPizza(int index) => setState(() {
_pizza = pizzaMenu.getPizza(index, _pizzaToppingsDataMap);
});
Widget build(BuildContext context) {
return ScrollConfiguration(
behavior: const ScrollBehavior(),
child: SingleChildScrollView(
padding: const EdgeInsets.symmetric(
horizontal: LayoutConstants.paddingL,
),
child: Column(
children: <Widget>[
Row(
children: <Widget>[
Text(
'Select your pizza:',
style: Theme.of(context).textTheme.titleLarge,
),
],
),
PizzaSelection(
selectedIndex: _selectedIndex,
onChanged: _onSelectedIndexChanged,
),
if (_selectedIndex == 2)
CustomPizzaSelection(
pizzaToppingsDataMap: _pizzaToppingsDataMap,
onSelected: _onCustomPizzaChipSelected,
),
PizzaInformation(
pizza: _pizza,
),
],
),
),
);
}
}
The final result looks like this:
As you can see in the example when selecting any of the pre-defined recipes, the final price of the pizza is recalculated as well as the description of its toppings is provided. Also, for the custom pizza, the price is recalculated every time a topping is selected or deselected, and the pizza's description is updated, too.
All of the code changes for the Decorator design pattern and its example implementation could be found here.
To see the pattern in action, check the interactive Decorator example.